Install your own rain barrel and save water (and a little money)
The warmth and greenery of spring has me outside working in the garden again! A few weekends ago, it was time to set up my two rain barrels now that the threat of freezing is behind us and the garden is growing. Last year I convinced my husband to let me get two rain barrels to support our new raised bed garden and it was the best decision ever (he thought the barrels were ugly and I thought they matched the brick perfectly! He has since accepted them). I exclusively watered our 76 square-foot raised bed garden, plus two existing planter boxes, the new raspberry patch, and some added perennials in my native plant garden with the water from these rain barrels throughout the season. I did not have to turn on the hose once for my vegetable plants, which is good, because the hose doesn’t reach our raised bed anyway!
Collecting water in rain barrels is excellent for saving some money by reducing your municipal water consumption but is also benefits the environment by reducing runoff from your property. According to the World Wildlife Fund, an average-size roof can collect 600 gallons of water for every inch of rain, which translates into a lot of runoff. Chemicals used in lawns and gardens as well as other pollutants that collect on impervious surfaces like roads and driveways are swept into streams by stormwater runoff and can destroy aquatic habitats and organisms. Runoff containing agricultural fertilizer contaminants is a big problem that can create blue-green algae blooms, making lakes and streams toxic for humans and pets to swim in.
If you are sold on collecting rainwater, read on to see how to install rain barrels for your property.
Step 1: Figure out where your rain barrel should go
Evaluate the downspouts on your home and determine which one is most convenient to the area you want to water. I watered my garden by hand but will be installing a drip irrigation system in the future – either method requires your rain barrel be installed close to where you would like to water. Level the ground where you intend to put the barrel so it does not tip when full.
Step 2: Gather Materials
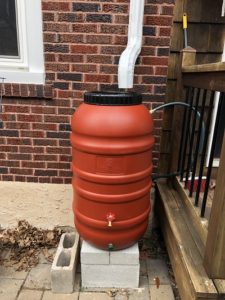
You will need your preferred rain barrel (you can buy them or make your own), some type of stand, and downspout elbow connections depending on the size of your downspout and distance from the existing downspout to the mouth of your rain barrel. You may need to buy a straight piece of downspout to connect between elbows, or you can use the remnants of your cut downspout. I have two different sized downspouts on my house and garage, so I used slightly different materials for each barrel location. My house has a round downspout, whereas my garage has a 2 x 3 inch rectangular downspout, which is more common. Choose a barrel that has screened inlet and outlet ports to prevent mosquitos from colonizing your water source and that also collects leaves and large junk that flows off of your roof.

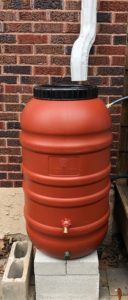
For the stand: Rain barrels rely on gravity to dispense water, and should be placed on blocks or a stand to elevate the spigot. My barrel has a spigot 10-15 inches above the bottom which could be used from ground level, but to empty the barrel completely from the bottom outlet port, it needs to be installed 1-2 feet off the ground. I used two 8 x 8 x 16 inch hollow concrete blocks with two 4 x 8 x 16 inch concrete blocks to provide a flat base, lifting my barrel 1 foot off the ground. You can also buy or make wooden stands, but getting concrete blocks was simple and cheap for my setup, and will not rot over years of being outdoors. Materials:
- rain barrel – I love the Camel’s Hump barrels, as they are a local Pennsylvania company that uses recycled food-grade olive barrels
- stand (Example: concrete blocks – 2 of 8 x8 x 16 inch blocks with 2 4 x 8 x 16 inch blocks for the top of the stand)
- 2 downspout elbows
- straight downspout piece if needed (you can use the leftover of your original downspout)
- silicone caulk
- sheet metal screws
- hack saw
- pliers
- drill
- overflow hose (I used a 6 foot “leader hose”)
- coiled spring faucet connector
Step 3: Determine where to cut the existing downspout 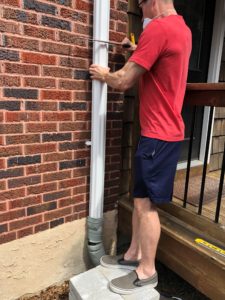
In order to cut the downspout, you have to take into account the height of the rain barrel on the stand as well as the length of the elbow connectors. I used two elbows connected in an “S” shape to get water to flow from the downspout into the barrel. The elbows will connect to each other and the downspout by nesting inside the other, so you will lose an inch or two in the connection. You should also leave a few inches of space between the barrel and bottom of the elbow to make sure you can take the lid on and off as needed. I held up the two elbows in the “S” configuration leaving a few inches of room above the barrel top and eyeballed how high to cut the downspout. Cut conservatively – you can always cut more later if needed. Use a hacksaw to cut the metal downspout. If you have a really large roof, you may want to consider installing a downspout diverter instead of removing the rest of the downspout entirely, as I did. In heavy storms, the barrel could overflow from a large roof area. My house roof and detached garage roof are both fairly small and don’t have this issue.
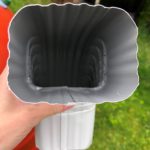
Step 4: Crimp the bottom ends of the downspout and elbows
In order for your downspout not to leak, you need to nest the higher piece inside the lower piece. Do it the opposite way, and the water will flow out the sides instead of being contained inside the tubing. Crimp the cut end of the downspout using a set of pliers so the bottom side is small enough to fit inside the first elbow piece. My elbows were unidirectional – one end was larger and the other was slightly crimped to already fit inside another piece of downspout.


Step 5: Attach the elbows to the downspout and make sure your setup works 
After the appropriate ends are crimped, push the elbow on firmly to the bottom of the downspout until you can’t push it farther. Repeat the process with the second elbow. Set up your rain barrel and make sure your configuration works, and tweak as needed.
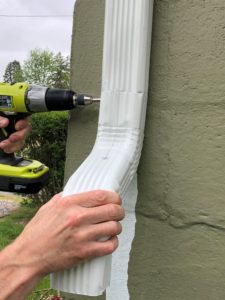
Step 6: Screw in your new downspout
Use the sheet metal screws to securely attach the elbows to each other and the downspout. We found it helpful to drill small pilot holes in the metal before using the screw. Before tightening screws all the way, lubricate the threads with silicone caulk to create a water-tight seal. Read the instructions before setting this up – the caulk we used needed 30 minutes to be water-ready, so plan to do this on a day when rain is not in the forecast.

Step 7: Put your rain barrel on the stand and admire your handiwork! 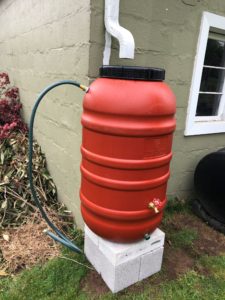
Our first rain barrel install took us about an hour to complete with a few hiccups. Our second barrel install took us less than 30 minutes, and we completed it just in time for a big storm. We didn’t exactly wait the required time for the caulk to dry, but it seems to have held up fine! Attach your overflow hose to an upper outlet port. My barrel has two on either side. Feed this hose into what remains of your existing downspout or direct it away from the foundation of your home. The rain barrel will fill up quickly in a heavy storm, so it’s important to have an overflow path installed to make sure the excess water doesn’t end up in your basement. Now your barrel is ready to use! You can connect a hose and use it within a short distance of the barrel or you can fill watering cans. Since I was filling rain barrels, I also added a short coiled spring hose connector to the spout of my barrel to direct it into my rain barrel (like this one from Lowes).
I installed two 58-gallon barrels in two different locations on my property, but only hand watered using watering cans with them. Based on my garden layout, I didn’t have rain barrels close enough to use hoses, so I had to walk back and forth with watering cans. While this was great daily exercise, it was rather time consuming and I don’t think I watered deeply enough for some of my vegetables. Next year, I plan to install a few more barrels in series so I can accumulate enough water so that I can hook up a pump and water the beds via a drip irrigation system. To connect barrels in series, I will install another barrel at the same height using the same concrete block stands. My barrels have a bottom port that a short piece of hose or PVC pipe can be used to connect to the bottom of the adjacent barrel, and they will fill together as long as they are installed at the same level. You can also use another barrel as an overflow. Hopefully you found this helpful and are excited to be saving some rainwater! Happy gardening!